


Standard bored pile construction process in 10 steps from setting out to acceptance
In just a few minutes, you can understand the complete bored pile construction sequence, what must be done at each stage, and the common errors that may reduce pile integrity.
Explore this topic in the context of Vietnam.
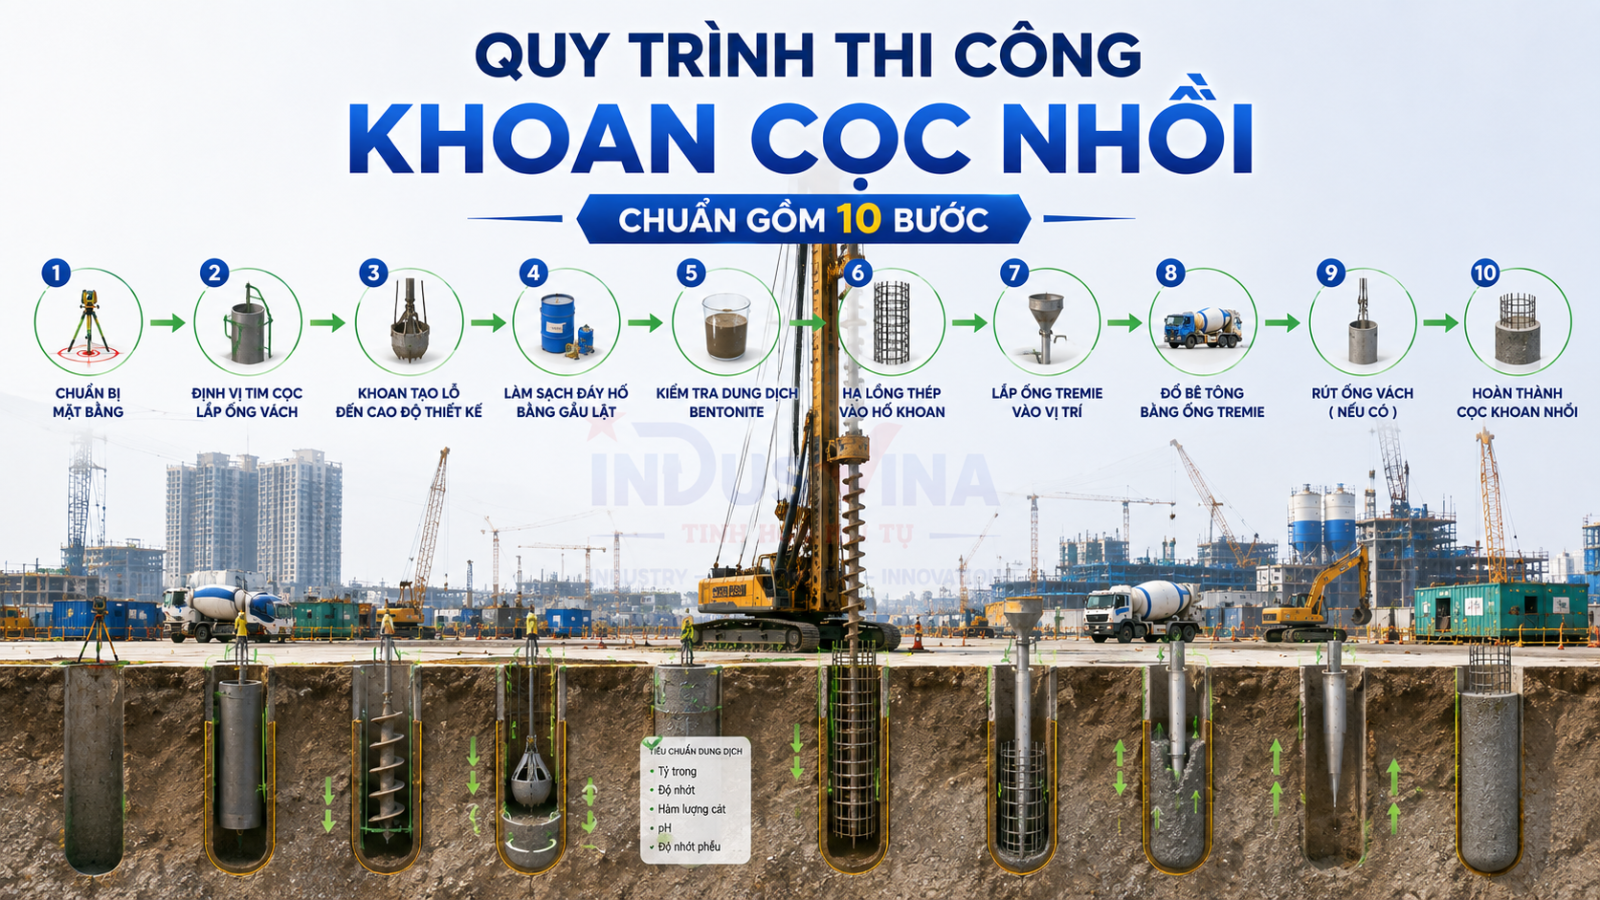
Main contents
1. What is the bored pile construction process?
The bored pile construction process is a continuous sequence of setting out, stabilizing the bore opening and walls, drilling, base cleaning, lowering the reinforcement cage, installing the Tremie pipe, concreting, inspection and acceptance.
Every stage directly affects pile position, verticality, load-bearing capacity and structural integrity. The work should therefore be organized as one integrated workflow.
Technical objectives
- Correct centerline, diameter and design depth.
- Stable bore walls and a clean bore base.
- Reinforcement cage correctly positioned and free from deformation.
- Continuous concrete placement without contamination by slurry or drilling fluid.
Three critical control points
- Bore-wall stability throughout the construction period.
- Base cleaning before concreting.
- Tremie embedment depth and continuity of concrete placement.
2. Ten-step bored pile construction timeline

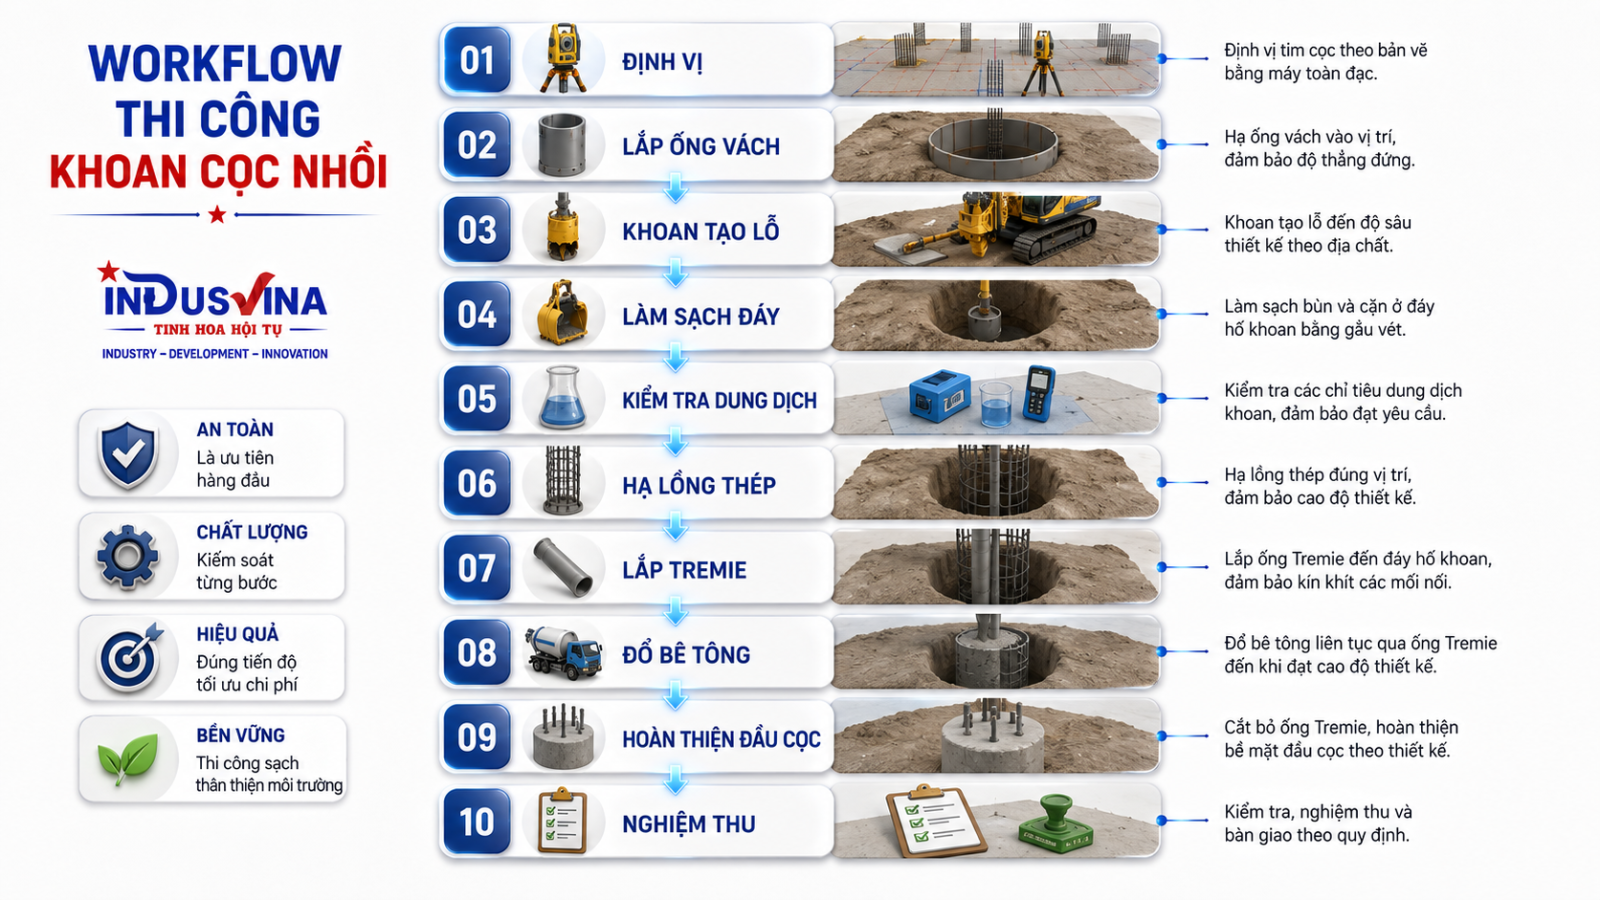

3. Detailed ten-step bored pile construction process
Prepare documents, site and equipment
Check drawings, technical specifications, pile locations, access roads, rig platform, power and water supplies, and the slurry and spoil containment areas.
Note: The drilling rig platform must be sufficiently stable to prevent settlement or tilting during operation.
Set out the pile center
Use a total station to establish the centerline and elevation in accordance with the drawings. Survey control points must be cross-checked, protected and clearly marked on site.
Common error: Loss of survey marks, use of an incorrect control point, or failure to recheck after equipment movement.
Install the temporary casing
The casing guides the bore, protects the bore opening and reduces collapse in the upper soil layers. Verify its position, elevation and verticality before deep drilling.
Note: A tilted casing can cause the entire pile shaft to deviate.
Drilling
Drill to the specified diameter and depth while monitoring soil strata, slurry level, drilling speed, verticality and any abnormal conditions.
Common error: Slurry loss, bore-wall collapse, bucket jamming or underground obstructions.
Clean the bore base
Use a clean-out bucket, slurry circulation or another approved method to remove sediment. Recheck depth and base condition before proceeding.
Critical hold: Do not proceed to concreting until the bore base is clean.
Test the supporting slurry
Test density, viscosity, sand content and slurry level in accordance with project requirements. The slurry must stabilize the bore walls without contaminating the concrete.
Note: Results must be recorded at the time of testing.
Fabricate and lower the reinforcement cage
Check cage diameter and length, main bars, links, splices, spacers, lifting points and CSL access tubes where required. Lower the cage slowly, keep it centered and never force it.
Common error: Cage deformation, impact with the bore wall, jamming or uplift during concreting.
Install the Tremie pipe
The Tremie must be clean, watertight, sufficiently long and installed close to the bore base. Check joints, hopper, separation plug and contingency arrangements.
Note: The Tremie outlet must remain adequately embedded in fresh concrete throughout placement.
Place concrete through the Tremie
Place concrete continuously from the bottom upward so that it displaces the slurry. Monitor concrete volume and level, slump, truck timing and Tremie embedment.
Serious error: Pulling the Tremie outlet out of the concrete or allowing prolonged interruption.
Finish and accept the pile
Extract the casing in accordance with the approved method, protect the pile head, remove weak concrete and perform the specified tests before acceptance.
Required result: Correct pile position and depth, continuous concrete and clear quality records.


4. Pre-drilling and pre-concreting checklists
Before drilling starts
Before Tremie concreting


5. Ten common bored pile construction errors

6. QC, ITP, Hold Points and records: an essential overview
This article focuses on the ten-step process. QC/QA, ITP, Hold Points, tolerances, acceptance forms and test records are therefore introduced only at an overview level to keep the article focused.
Key verification points
- Pile center, elevation and casing.
- Bore depth, base condition and slurry.
- Reinforcement cage and Tremie pipe.
- Concrete, slump and placement log.
- Post-construction testing and acceptance.
Minimum records
- Setting-out record and drilling log.
- Slurry and bore-base inspection results.
- Reinforcement cage acceptance record.
- Concrete delivery tickets, slump tests and specimens.
- PIT, CSL or load-test results where required.
Read the pillar article for more detailed guidance on construction methods, QA/QC, ITP, Hold Points, risk control, testing and acceptance records.
View the standard bored pile construction method →7. Conclusion
A high-quality bored pile does not result from one isolated operation. It depends on maintaining the correct sequence, verifying conditions before each transition, and coordinating the survey, drilling, reinforcement, concrete and site supervision teams.
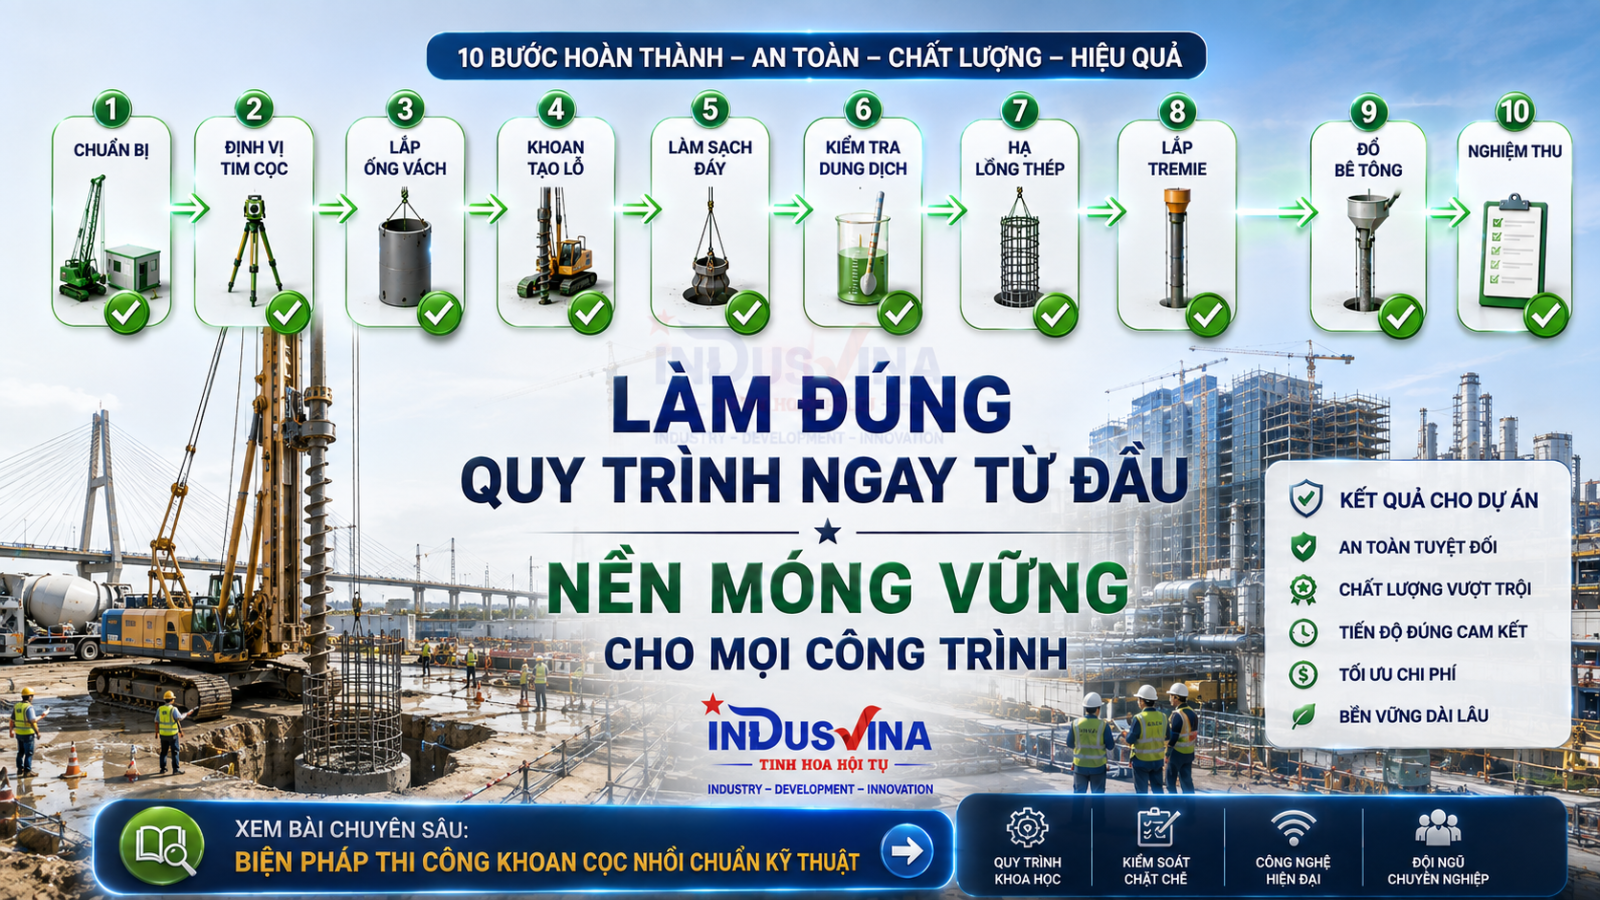
FAQ – Frequently asked questions about the bored pile process
How many stages are in the bored pile construction process?
It can be organized into ten main stages: preparation, setting out, casing installation, drilling, base cleaning, slurry testing, lowering the reinforcement cage, Tremie installation, concreting and acceptance.
Which stage is the most important?
No single stage should be considered in isolation. The three most influential controls are bore-wall stability, base cleaning and technically correct continuous Tremie concreting.
When may the reinforcement cage be lowered?
Lower the reinforcement cage only after the bore has reached the required depth, remains stable, the base has been cleaned and the slurry parameters comply with the technical requirements.
Why must the Tremie remain embedded in concrete?
To prevent fresh concrete from directly contacting slurry or groundwater and to reduce segregation, voids and discontinuities in the pile shaft.
How long does it take to construct one bored pile?
Duration depends on diameter, depth, ground conditions, equipment productivity, site constraints and concrete supply. The article timeline is for sequencing only and does not replace a project-specific program.
How are bored piles commonly tested?
Depending on the design and project requirements, testing may include PIT, CSL, static load testing, PDA or another appropriate method.
Are ITPs and Hold Points required for bored pile construction?
Projects normally require an inspection plan and verification points before work proceeds to the next stage. The exact scope must follow the contract documents, technical specifications and the requirements of the Employer or supervising consultant.
Which article provides a more detailed construction method?
Read INDUSVINA’s “Standard bored pile construction method” article for more detail on quality control, risks, ITPs, Hold Points, testing and acceptance records.
Connect with INDUSVINA
INDUSVINA welcomes discussions with customers and partners regarding construction, MEP, MRO maintenance, technical supply and project cooperation.


